Main Interface[]
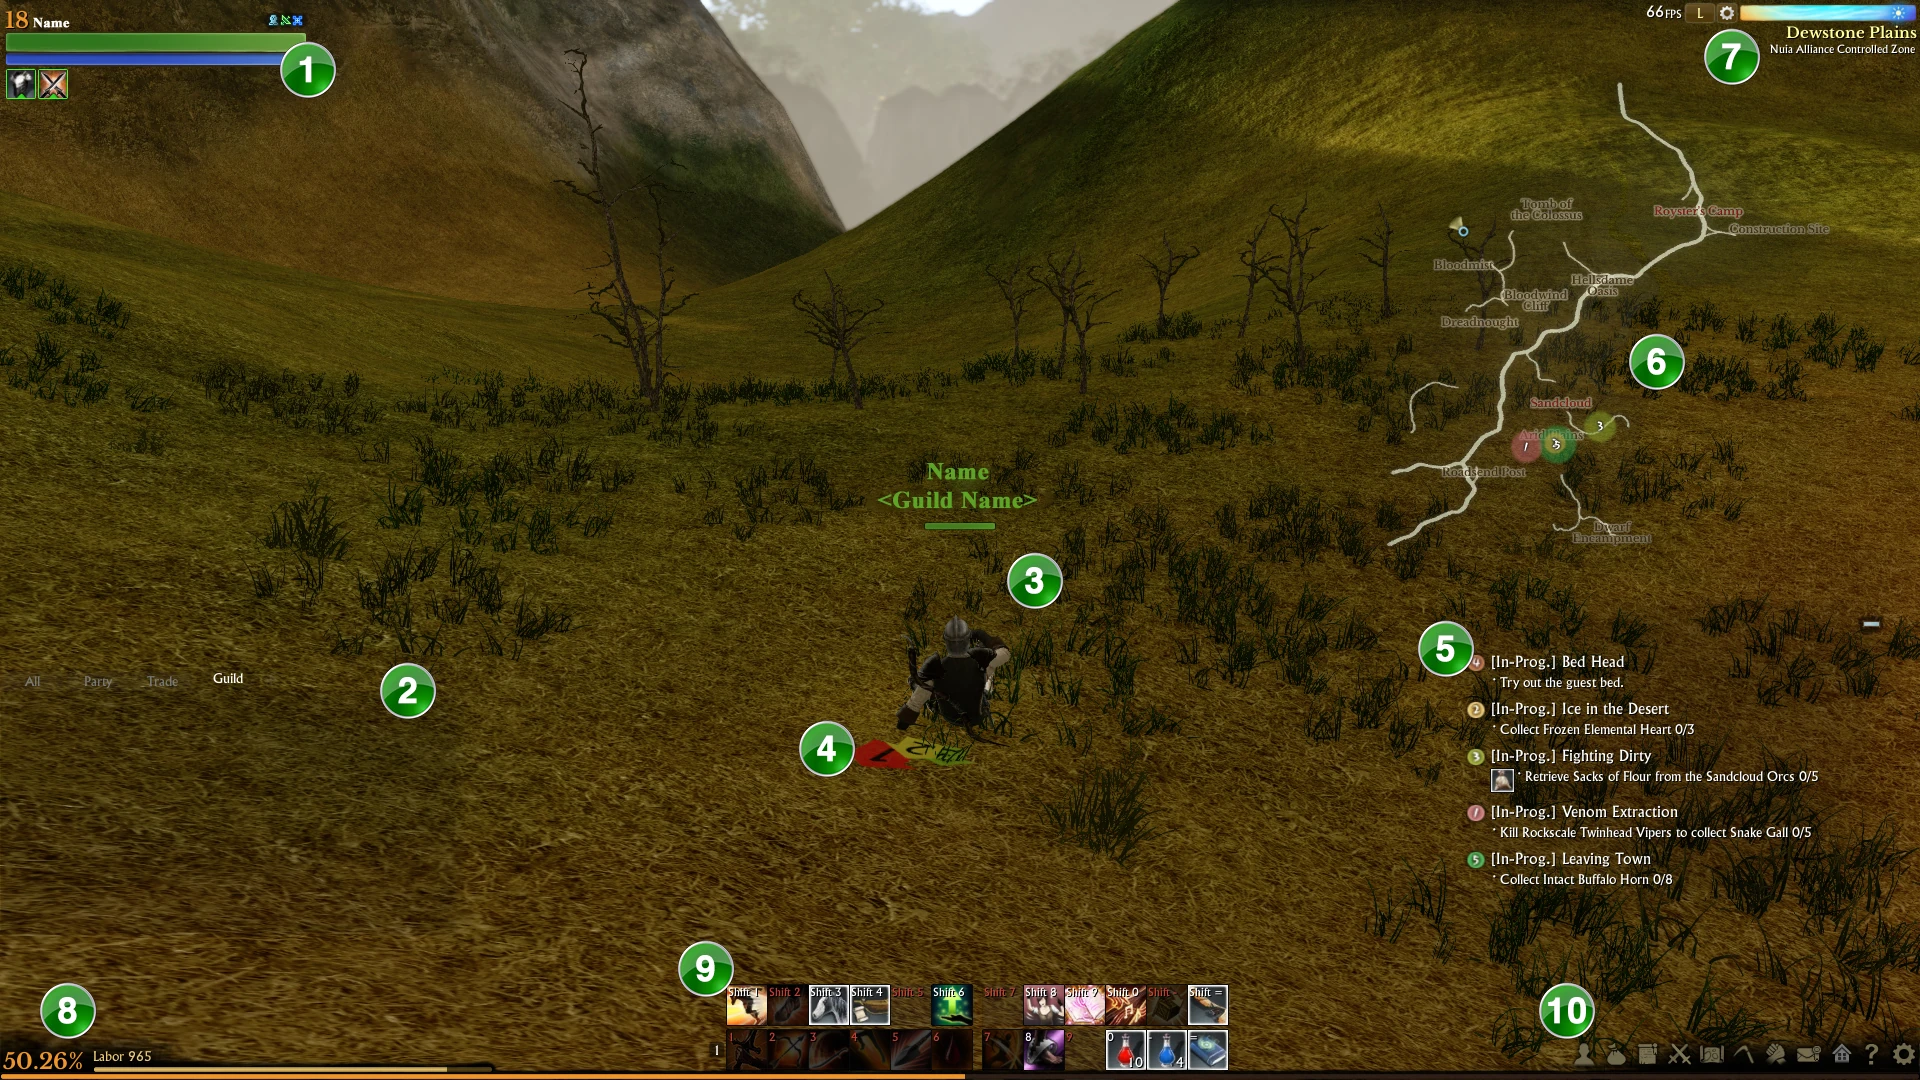
- Health and Mana Bars, Buff/Debuff Indicators, Build Icons, Level, Player Name.
- Chat box.
- Your character while playing in third-person.
- Quest arrows.
- Quest tracker.
- Mini-map.
- Day/Night Indicator and zone name.
- Experience bar and Labor bar.
- Skill bar.
- Menu bar.
Main elements[]
Buff/Debuff Indicators[]
Under your death and mana bar, there will be a series of icons that show buffs and debuffs. Buffs have a green border around them, while debuffs have a red border.
Build Icons[]
Chat Box[]
You can use the chat box to communicate to other players. There are several different channels you can type in. Some are available at all locations such as Faction, Nation, and Trade Chat. Some channels are for specifically for the zone one is in. These are the Shout and LFG (looking for group) channels. Other channels include Local (anyone physically by your character can see it), Guild (for chat if you are in a guild), and Family (if you are in a family.
Day/Night Indicator[]
Mouse over to get the in game time. This can be significant as there are some quests that are only achievable at certain times of the day.
Experience bar[]
If it shows a darker tail it means you've lost some experience because you died and that you are able to get it back by praying to a Priestess of Nui (there are shrines all over). Praying costs labor, but restores experience.
Health & Mana Bars[]
Located (by default) on the top left of your screen. By default, they are not set to display the amount of mana numerically but it can be enabled in the Settings/Options menu.
Interaction Indicators[]
When you go near an NPC or object, you can interact with it. Usually, they have a floating exclamation mark if they can be interacted with. However, sometimes they do not have the exclamation mark, so you will have to click on it or look at the options denoted by the F, G, H, and I buttons (if you set a different keybond for these, it will be different). You can mouse over the icons for the F/G/H/I buttons to see more detailed information.
Labor Bar[]
This bar is right above the Experience Bar. It will be the thinner yellow bar. It tells exactly how much labor a player has left. The maximum amount of labor allotted for Free-to-Play accounts is 2000, and regenerates 5 Labor every 5 minutes of being online. They gain no Labor offline. Patrons may have a maximum of 5000 Labor at one time and regenerate 10 Labor every 5 minutes AND are granted 10 Labor for every 5 minutes of being offline.
Menu Bar[]
Each icon will bring up a window or a small menu that will offer you multiple windows.
The final icon brings up a menu where you can
- Access the in-game Wiki (but it's not very good and won't let anyone edit it)
- Exit the game (normally a 10 second wait, but if you have an active summons - horse, pet or boat - it's a 10 minute wait. If you are in combat, it will take 1 minute to close.)
- Bring up the options panel.
You really want to have a look at the options panel.
- Auto target skills it worth setting, as it makes it a lot easier to defend yourself if you are jumped.
- Double jump to launch glider is worth setting. Makes for some interesting jumping/climbing/flying movement modes.
Mini-map[]
You can change the size of the Mini-map using the button directly above it. By default it is set to 'L' (Large). You can also click on the gear icon to show or hide the minimap, and the icons on it.
Party/Raid UI[]
When you are in a party, you will have (on the left side of the screen) your party members in a light blue color. It is much like your Status bar but it is smaller. When you right click on your name you can access various options such as leave party and mark. If you are the party leader you can set how loot is distributed and you can click on another person's name to kick them out of the party or delegate your party leadership to them.
Raids are quite similar but have a different UI. Raid members are shown a small blue rectangle on the center left of the screen, with their name on it. Raid members can choose a role (Attack, Defend, Heal, Undecided), then their blue rectangle will change color according to the role chosen. The raid leader can set loot distribution options and kick members from a group, just like a party leader can. However, they have a Raid window they can open (Shift R) in which they can do a radius invite and move members around to arrange parties. Those not a raid leader can set the raid member UI to be regular size or smaller, and to toggle displaying party members as well.
Quest Arrows[]
Ctrl + Q to toggle quest arrows.
Quest tracker[]
The quest tracker displays quests you have enabled to track in your Quest Log. You can choose which quests to track in the Quest Log by clicking the checkbox. You can choose to display or not to display the quest arrows by clicking on a quest in the Quest Tracker's number icon.
Skill Bars[]
You can have up to 4 skill bars - use the options menu to add and remove them from the display.
To the right of the skill bars is a little padlock icon - click to change from locked to unlocked. Unlocked it lets you drag icons around the skill bars, locked you can't move them. If you find you're picking icons up and reshuffling them in the middle of combat, click on the little padlock to lock the skill bars. Makes it so much more playable with a mouse (and, yes, the default is unlocked).
Mount and Glider skills[]
Mount and glider skills depend on what kind of mount you have summoned, or what glider you're flying on. They are not set to any keybind by default, but can be set in the Settings menu.
Moving and Hiding main elements[]
You can move around elements such as your status bar and summon/mount/battle pet status bars by pressing the Shift button and left clicking it, then dragging it around to the desired location. You can hide the minimap on the top right corner by clicking the gear icon by the Day/Night indicator and toggling the map on and off. Hold Shift + Click and drag to move the quest tracker.
Temporary windows[]
Crafting Portfolio[]
Press "O" to open the Crafting Portfolio. In this window, you can browse through crafting recipes, and search for products or find what item uses a certain material.
Loot[]
When you loot a corpse, you can either loot everything in it or select what you want. In a party or raid, people can choose to roll or pass on drops (you can also auto-roll or auto-pass by selecting the checkbox that appears on a loot popup or by right clicking your status bar and selecting it). The loot window will disappear when you close it, roll/pass on it, or if the time to roll/pass on the drop expires. A bar under the loot will show how much time is left to roll or pass on the item.
Map[]
Press "M" to open the Map window. In the window, you can:
- View various zones on the map (some areas, like dungeons or Mirage Isle, will not show up on the world map)
- Toggle icons for specific areas, vendors or workbenches
- Mark on the map with a target, person icon, sword icon, or draw up to ten points
- Zoom in and drag the map around
- See routes of carriages, airships and gondolas
Plant Growth Information[]
Mousing over a plant will provide information, such as what the plant is, how much time is left to grow, how much time is left until it dies, and it's status.
Property Information[]
Looking at someone else's property information tells you how much decor/special decor is in one's house, date of demolition (if applicable), and if one's taxes are paid or not. Looking at your property information will tell you those things listed above, as well as the option to demolish a building, sell a building (if applicable), full-kit demolish a building, or to sell a building (if applicable). You can also prepay taxes by looking at the property information window.
Vendors[]
At a vendor, you can purchase their goods or sell items in your inventory. You can hold up to ten stacks of different (or the same) items. You can sell up to 10 things at once, and it can be bought back for the same price you sold it for.